Four Low-Cost Athlete Readiness Tools for Small Schools
"What gets measured, gets improved upon," right? One can only hope that what we measure in the weight room has context that backs up our programming decisions. Most coaches analyze athlete readiness as soon as their team walk through the door, we can see it on their face, the way they walk, if they say hi to you, but, this is subjective and can sometimes be inaccurate. What one athlete feels is different than the other, some athletes will play more minutes than others, so how do we get a solid reading on if they are able to safely and effectively manage the session. Some coaches may not think that they have the ability to start an athlete readiness program on a larger scale due to a lack of resources, from knowledge, to equipment, to manpower. While having access to more resources can lead to better monitoring of our athletes, there are several lower-cost and time-effective readiness tools that can help coaches monitor their athletes’ readiness on a budget. In this article I will discuss what tools might be effective for your programs and what the cost for each looks like.
So, what is athlete readiness, and how can we get a readiness metric? Readiness monitoring is assessing an athlete’s physical and mental preparedness for that particular day. You can accomplish this through various methods, some that are easy to implement immediately and some that require more work up front. Common readiness practices at larger schools with larger budgets include force plates(Hawkins, VALD), Catapult, Polar Straps, Moxie systems, OmegaWave systems, GymAware, Tendo units, and even team doctors. The benefits of monitoring an athlete’s readiness are having the ability to keep your athletes from under recovering and making more appropriate adjustments to a training plan if necessary, key word "necessary".
When monitoring athletes, you want to ensure that the information will provide context and help drive training decisions. Not every affordable measure will fit every environment and be appropriate—it is the coach’s responsibility to figure out if the juice is worth the squeeze when it comes to committing to a readiness tool. Is it worth paying almost $10,000 for force plates to get readiness scores, probably not, but is it worth it with a large budget and student athlete population, probably.
Like previously stated, a coaches most valuable assessment tools are their eyes and ears. These tools provide insight, read people well, and help with athlete buy in, it is a two way street. When you can tell an athlete is feeling down, and you ask "how are you doing," it tells athletes that you care, and when you adjust your programming based on subjectively insightful information, athletes see that and your relationship grows. But, in the end, being a successful communicator is a requirement for a coach, and it also comes into play when implementing a more strategic monitoring strategy. The following four assessment tools can help coaches cover their entire team and pursue a more organized program, at low cost.
- Questionnaires
- RSI Score
- Vertical Jump
- Isometric Mid-Thigh Pull
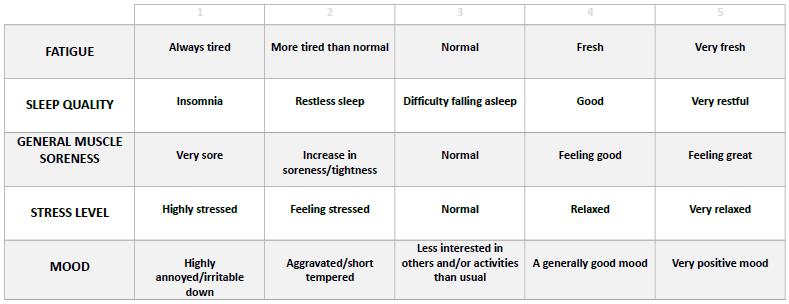
You can use questionnaires for some teams and find success—not necessarily because it shows a magical number, but rather because it can help open the door for a conversation. If you see that an athlete has put a low number on morale or overall readiness for multiple days, in a row, then I will have a productive conversation with that individual.
Figure 1: Athlete readiness questionnaire2. Reactive strength index (RSI) is a test designed to measure an athlete’s reactive jump capacity, specifically how well an athlete is able to cope with stresses applied through landing in jumping and plyometric activities. It is a ratio of how high an athlete jumps after landing: to how long they were in contact with the ground. It was first developed in 1995 by Young as part of the Strength Qualities Assessment Test (SQAT) in collaboration with the International Athletic Association (Flanagan, 2008).
So, if an athlete is able to jump really high after landing, then they will have a better RSI. Similarly, if an athlete is able to land and jump again very quickly, then they will have a better score. RSI demonstrates an athlete’s ability to quickly and effectively transfer from an eccentric to a concentric contraction, therefore, it represents their ability to greater utilize the stretch-shortening cycle and their explosive capabilities during dynamic jumping activities. An athlete’s ability to quickly and effectively move through the stretch-shortening cycle is important for almost all sports. A 10% decrease in score will result in another test to prove validity and if another 10% decrease occurs, a conversation is had.
Figure 2. Reactive Strength Index Chart
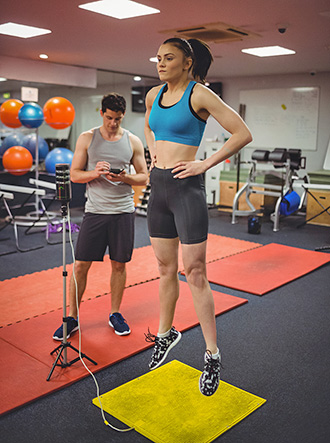
Coaches in the strength and conditioning field have the ability, and tools to measure how well athletes create, absorb, and redirect force. To determine readiness, you’ll need to find a way to test athletes ability to handle repeat acceleration and deceleration, welcome the 4 Jump test. The athlete starts on the jump pad with hands on their hips, and jumps repeatedly as high and as fast as possible for four jumps. This will either give you a ratio number on the JustJump Mat of their jump heights and ground contact times, or if using broad jumps instead, a total distance. In both cases, the larger the number, the better the athlete did and the more “springy” they are. JustJump Mats are the spendiest item on this list, selling for $750 brand new, but less than $500 used. Compared to expensive Force Plates or other Sports Science tools, that is one-tenth of the price.
Figure 3: 4 Jump Test
3. Vertical Jump is another assessment that can help monitor training readiness. It meets the same required criteria of being quick, semi-affordable, and reliable for recognizing athlete fatigue.
Step one is to find a testing tool that you can use consistently. Like using a jump mat, it’s quicker and flows better in a group setting than jumping with a Vertec. Either is fine, and most facilities are equipped with one or the other (or at least can find room in the budget to purchase a reliable vertical jump testing tool). This style of jump takes full advantage of that counter-movement hip action. In a static jump, the athlete again prepares to jump with their hands on their hips—but in this jump, it is all about a rapid drop to their jump stance and immediately jumping from there. It is important to test often and under the same testing standards, I test my teams once a week after warm-ups and before the first lifting block, once a week for the vertical jump, once a week for the 4-jump test.
Keeping the testing procedures consistent is important for creating more data and making the numbers more reliable, it also helps with the flow of the training session. Eventually, the athletes just knew that we perform a vertical jump or 4-Jump to conclude our warm-up and start the session. When looking at the data, I stick to the rule of 10% drop-off being a red flag. If an athlete jumps under the 10%, I allow another rep to ensure it wasn’t just a poor rep; if the jump is similar or even worse, then we can look to adjust the training plan.
Figure 4: Vertical Jump Test4. Isometric Mid-Thigh Pull (IMTP) is a maximal isometric strength test done with force analysis hardware (force plate, dynamometers) and a static locked in place piece of hardware like a chain or even a barbell. Similar to the end position of the 1st pull of a clean or the lockout of a deadlift, the exercise is isometric in nature, the bar doesn’t move because it’s locked in place (static) with a chain. The athlete needs to push with their legs into the ground, and put all-out effort into pulling the bar vertically to estimate max strength and rate of force development (RFD). To boil down the essence of the IMTP in short detail, here are three reasons to use this form of assessment.
- The test has high validity and represents exactly what it measures.
- Safety worry is low, unlike many maximal strength tests.
- Using the IMTP in team environments is practical and time-efficient.
A big reason for the implication and use of this test in-season is to get a max strength number without the need of a dedicated testing day and the need for an axial loaded measurement like a back squat 1RM. While max effort options like squatting are worthy, the risk and residual fatigue afterwards is a burden that just isn’t worth getting a readiness metric in-season. I am a fan of maximal strength and train my athletes for it, but testing it has risk and baggage after. Even though the test is a maximal strength assessment, it’s isometric, so the residual soreness and fatigue associated with intense assessment is lower than with loaded barbell tests.
Here is the kicker, you DO NOT need force plate for this test. In the physical therapy setting, therapists will use dynamometers to measure asymmetries in leg/arm strength. Well, a dynamometer is essentially a spring loaded device like a scale that measures force output, like a force plate. Using a Crane Scale purchased from amazon for $50 I am able to get accurate and reliable readings for the IMTP in less than 3 seconds, being able to switch between kg, lb, and Newton readings.
Link: Crane Scale Link
Reliability and validity only increases as athletes have increased exposure to the test and get used to what the test is going to feel like. Set up is simple and to adjust the chain for each athlete, begin by unhooking the scale from the chain, have the athlete hold the straight bar at their mid-thigh position, rehook the chain to the scale, get ready to pull.
Figure 5: IMTP TestGetting a baseline or “max” is the first objective, after that, monitoring anything larger than a 10% drop-off as a red flag, that would potentially influence training. If consistently, each time there was a significant drop, it usually is around a time of chaotic stress or injury. The only downside to this method is that there is high variability at first, it takes some time before you can create a reliable average and begin to see patterns. Since it is so accessible to test, though, the numbers will accumulate quickly.
The best part about this test though, competition. The athletes see each-others scores and can compete weekly. It pays to be a winner.
All coaches want to know that they’re making the right decisions to drive their athletes in the correct direction. Much like the value of a map on a long road trip, readiness tools can offer coaches insight that they are on the correct path and doing what is right for the athletes. Implementing these options is almost always a low risk/high reward option that coaches can do without altering their coaching or their environment. Monitoring athlete readiness does not have to be an expensive or complicated process. These methods are also cost- and time-effective, allowing coaches to make better training decisions. So how will you use them?
References
Alhamad, Rami. “The Reactive Strength Index Revisited - Part 2 by Eamonn Flanagan // Push // Train with Purpose.” PUSH // Train with Purpose, PUSH // Train with Purpose, 7 Dec. 2017, https://www.trainwithpush.com/blog/reactive-strength-index-revisited-2.
Crane Scale How to Guide - Science for Sport. https://www.scienceforsport.com/wp-content/uploads/2019/04/Crane-Scale-How-to-Guide.pdf.
Jovanovic, About Mladen. “Wellness-Questionnaire.” Complementary Training, https://complementarytraining.net/how-to-make-a-readiness-monitoring-using-a-simple-wellness-questionnaire-addendum/wellness-questionnaire-2/.
“Reactive Strength Index.” Science for Sport, 6 Jan. 2021, https://www.scienceforsport.com/reactive-strength-index/#toggle-id-1.
Valle, Carl. “Decoding the Isometric Mid-Thigh Pull Strength Test.” SimpliFaster, 17 Apr. 2020, https://simplifaster.com/articles/isometric-mid-thigh-pull-strength-test/.
Flanagan, E.P., Ebben, W.P., and Jensen, R.L. (2008). Reliability of the reactive strength index and time to stabilization during depth jumps. Journal of Strength and Conditioning Research. 22(5), pp.1677–1682.


Comments
Post a Comment